
Ah, bread—the epitome of comfort and warmth. You know, there’s something inexplicably magical about the aroma of fresh bread wafting through the house.
I remember the first time I attempted baking bread; it was a chaotic mess of flour and excitement, but the result was a golden crust that felt like a hug in every bite. This easy one-hour bread recipe is a game-changer (oops—almost forgot, no game changers here).
Whether you’re a seasoned baker or a curious newbie, this recipe is your ticket to homemade bliss in just 60 minutes.
Steps
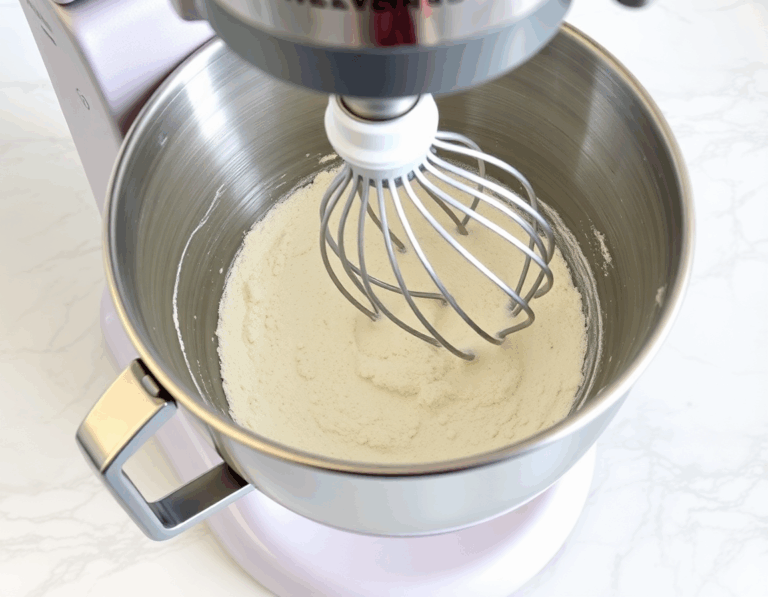
- In a stand mixer, combine the flour and yeast using the whisk attachment. Switch to the dough hook, add the oil, and gradually mix in the lukewarm water while kneading.
- Once the dough is nearly mixed, incorporate the salt and continue to knead until the dough achieves a smooth, compact texture, which should take approximately 5 to 7 minutes.
- Transfer the dough onto a lightly floured surface and shape it as desired. Place it onto a parchment-lined baking sheet, loaf pan, or Dutch oven, then cover it and let it rise in a warm, draft-free area for 30 to 45 minutes.
- Preheat your oven to 425°F (200°C) and position an empty pan on the bottom rack during preheating. Once heated, pour hot water into the pan to create steam.
- Score the top of the dough with a sharp knife and place the pan on the middle oven rack. Bake for 30 to 35 minutes until the bread’s internal temperature reaches 190°F.
- After baking, transfer the bread to a wire rack to cool completely before serving.
Ingredients
- hour bread recipe:
- 3 cups all-purpose flour
- ¾ cup plus 2 tablespoons lukewarm water
- 2 tablespoons olive oil
- 1¾ teaspoons instant dry yeast
- 1 teaspoon salt
Nutritional Values
Calories: 1681 kcal | Carbohydrates: 295 g | Protein: 47 g | Fat: 33 g | Saturated Fat: 5 g | Polyunsaturated Fat: 4 g | Monounsaturated Fat: 22 g | Sodium: 2344 mg | Potassium: 603 mg | Fiber: 16 g | Sugar: 1 g | Vitamin C: 0.1 mg | Calcium: 64 mg | Iron: 18 mg
FAQ
- Can I substitute active dry yeast for instant dry yeast in this recipe?
- No, substituting active dry yeast for instant dry yeast is not recommended. Instant dry yeast is designed to work quickly and allow the bread to rise in the oven in a short time. Using active dry yeast will slow down the process and may result in less rise during baking.
- What is the secret to achieving a crispy golden crust on the bread?
- The key to a crispy golden crust is placing a pan of water in the oven while baking. The steam generated from the water keeps the bread’s exterior from drying out early, allowing it to expand properly. This steam also contributes to the development of a deliciously chewy and crispy crust.
- How should I store homemade bread to keep it fresh?
- After the bread has cooled completely, wrap it in plastic wrap. It can be stored at room temperature for several days. For longer storage, you can freeze the bread, where it will keep well for several months.
- What makes this bread recipe so quick to prepare?
- This bread recipe is quick because it uses instant yeast, which doesn’t require activation in water and speeds up the rising process. Additionally, the use of a steam bath in the oven helps the bread rise more efficiently while baking.
- Can this bread be baked in a Dutch oven?
- Yes, you can bake this bread in a Dutch oven. If using a Dutch oven, there’s no need to cover the bread with the lid during baking.
Tips
- Utilize Instant Yeast: Use instant yeast for this recipe as it eliminates the need for activation in water, allowing the dough to rise quickly and efficiently, making the bread ready in just an hour.
- Create a Steam Bath: While preheating the oven, place an empty pan on the bottom rack. Pour hot water into it once the oven is hot to generate steam, which helps the bread rise better and produces a chewy, crisp crust.
- Score the Dough: Before baking, score the top of your bread dough with a sharp knife. This not only enhances the appearance but also allows the bread to expand properly during baking.
- Proper Cooling: Transfer the baked bread to a wire rack to cool completely before slicing. This step ensures the bread maintains its texture and doesn’t become soggy.
Equipment
- Stand mixer with whisk and dough hook attachments
- Baking sheet
- Parchment paper
- Dutch oven (optional, if preferred for baking the bread)
- Wire cooling rack
- Instant-read thermometer (to check internal temperature of the bread)